


Step 1 :- Launch an ec2 instance (t2.medium, ubuntu ) and login to it and allow all traffic in security group .

Step2 — install jenkins on it and login to it.
sudo apt-get update
curl -fsSL https://pkg.jenkins.io/debian-stable/jenkins.io-2023.key | sudo tee \
/usr/share/keyrings/jenkins-keyring.asc > /dev/null
echo deb [signed-by=/usr/share/keyrings/jenkins-keyring.asc] \
https://pkg.jenkins.io/debian-stable binary/ | sudo tee \
/etc/apt/sources.list.d/jenkins.list > /dev/null
sudo apt-get update
sudo apt-get install fontconfig openjdk-11-jre
sudo apt-get install jenkins
sudo systemctl enable jenkins
sudo systemctl start jenkins
sudo systemctl status jenkins

Step 3- You need to install plugins like jdk , sonarqube etc.
Go to your manage Jenkins, chose manage plugins, go to available plugin,
and search jdk “Eclipse Temurin installerVersion1.5” installed without restart.
and then installed Sonarqube plugin “Sonarqube scanner” installed without restart.


meanwhile goto manage jenkins -> goobal tool configuration JDK installation give java name “jdk11” & and add installer, choose “installed form aduptium.net” then click on automatically” give the jdk version choose “11.0.9+7”

also configur maven and version selected as “3.6.0”

for the sonarqube installation, I am going to use the docker image of sonarqube rather than the installation of sonarqube directly so we need to install docker first
sudo apt-get update
sudo apt-get install docker.io -y
sudo usermod -aG docker $USER
sudo chmod 777 /var/run/docker.sock
sudo docker ps

after the docker installation, we create an sonarqube container out of it.
docker run -d --name sonar -p 9000:9000 sonarqube:lts-community

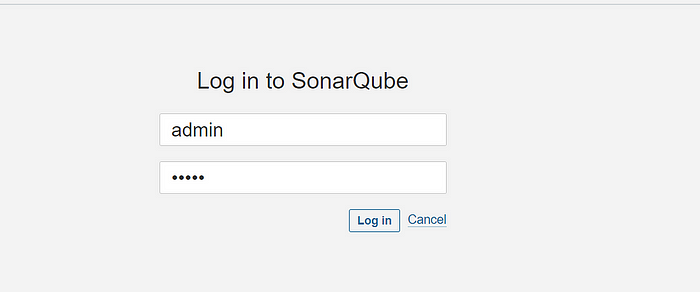
so login to the Sonarqube server (username and password as “admin” you change it later)

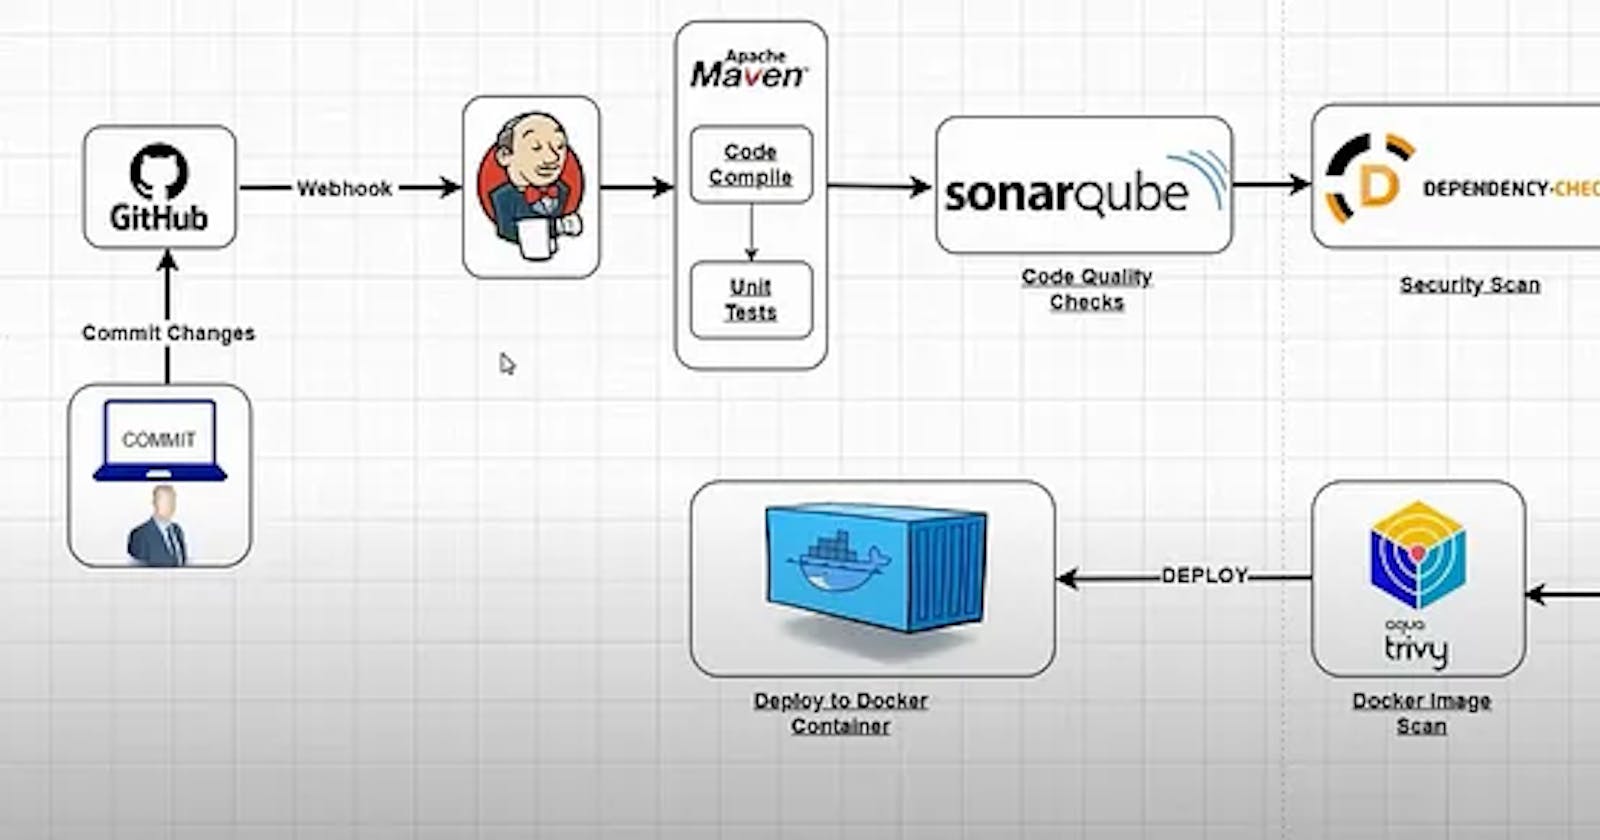
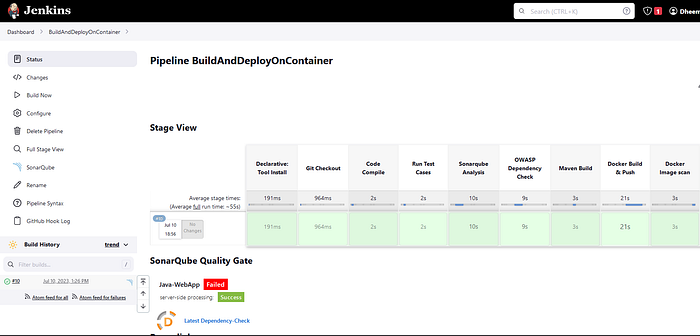
Step 4 — Now create a pipeline project , we are using a declarative pipeline in this project so first we checkout the code from Git Hub and compile and unit test it.

Now go to sonarqube and generate an token to integrate with jenkins server. ( goto administrator — ->secutiry — ->users — ->token and generate token)

Add this token to Jenkins credentials.

then go to configured system to sonarqube server give the provide the name “sonar-server” and give the “sonar server url” server authentication tokens “sonar token” and apply and save it.
now you configured the sonarqube scanner give the name of sonar-scanner and chose latest version sonarqube. and final apply & save.


now configure the sonarqube in pipeline and run the pipeline


now added ‘OWASP-dependncy -check’ plugin for it to check the any vulnerability in dependency.


added this stage to the pipeline.

After that build that artifact and deploy to docker for that you have to first login to dockerhub and paste the credentials also you have to add docker plugins like (docker , docker-pipeline , docker0build-step and Cloud Bees docker build and push ) then added docker in global tool configurarion and then configure the pipeline.


we can seen the docker image push to docker hub with latest tag

After that we scan the image for security purpose so we added trivy scan on it. so first you install trivy on the mechine
sudo apt-get install wget apt-transport-https gnupg lsb-release
wget -qO - https://aquasecurity.github.io/trivy-repo/deb/public.key | gpg --dearmor | sudo tee /usr/share/keyrings/trivy.gpg > /dev/null
echo "deb [signed-by=/usr/share/keyrings/trivy.gpg] https://aquasecurity.github.io/trivy-repo/deb $(lsb_release -sc) main" | sudo tee -a /etc/apt/sources.list.d/trivy.list
sudo apt-get update
sudo apt-get install trivy
trivy -v
Step 4: Create a Docker container from the Docker image.

Follow me on Github:-https://github.com/Reliable-Royalty-29
Finally, we can deploy the application:-

Here is the full pipeline script:-
pipeline {
agent any
tools {
jdk ‘jdk11’
maven ‘maven3’
}
environment{
SCANNER_HOME= tool ‘sonar-scanner’
}
stages {
stage(‘Git Checkout ‘) {
steps {
git branch: ‘main’, changelog: false, poll: false, url: ‘[github.com/Reliable-Royalty-29/SpringBoot-W..
}
}
stage(‘Code](pkg.jenkins.io/debian-stable/jenkins.io-202..) Compile’) {
steps {
sh “mvn compile”
}
}
stage(‘Run Test Cases’) {
steps {
sh “mvn test”
}
}
stage(‘Sonarqube Analysis’) {
steps {
withSonarQubeEnv(‘sonar-server’) {
sh ‘’’ $SCANNER_HOME/bin/sonar-scanner -Dsonar.projectName=Java-WebApp \
-Dsonar.java.binaries=. \
-Dsonar.projectKey=Java-WebApp ‘’’
}
}
}
stage(‘OWASP Dependency Check’) {
steps {
dependencyCheck additionalArguments: ‘ — scan ./ ‘, odcInstallation: ‘DP’
dependencyCheckPublisher pattern: ‘**/dependency-check-report.xml’
}
}
stage(‘Maven Build’) {
steps {
sh “mvn clean package”
}
}
stage(‘Docker Build & Push’) {
steps {
script {
withDockerRegistry(credentialsId: ‘D’, toolName: ‘docker’) {
sh “docker build -t webapp .”
sh “docker tag webapp dheeman29/webapp:latest”
sh “docker push dheeman29/webapp:latest “
}
}
}
}
stage(‘Docker Image scan’) {
steps {
sh “trivy image adijaiswal/webapp:latest “
}
}
stage(‘Deploy Container using Docker Image’) {
steps {
sh ‘docker run -d — name springboot -p 8085:8085 dheeman29/webapp’
}
}
}
}
I hope you guys like my article.
Happy Learning:)